

There’s something truly magical about Fruit Scones those golden topped, butter rich little towers of comfort that make any table feel a bit more special.
Hi, I’m Emily the recipe lover, taste-tester, and soul behind RecipesCommunity.com and today, I’m sharing one of the bakes that shaped my love for home cooking: these fluffy, fruit packed scones.
Let me take you back to a Sunday afternoon in my childhood kitchen. The air was thick with the smell of baking butter and laughter echoed off the walls as my mother dusted the counter with flour. My little hands would reach for the biscuit cutter (which was really just a drinking glass), and together, we’d press out the soft dough, waiting eagerly by the oven for those golden domes to rise. We always had them the same way split warm, spread thick with jam, and topped with a spoonful of cream. Simple, timeless, perfect.
That memory like so many others made around the table is why this recipe holds such a dear place in my heart. And now, through RecipesCommunity.com, it’s my joy to pass it on to you.
Whether you’re recreating a cherished family tradition or just craving something cozy for your afternoon tea, these Fruit Scones hit every note: quick, simple, and delightfully nostalgic. They don’t call for fancy ingredients just a few basics from your pantry and a little kitchen magic. In under 30 minutes, you’ll have a batch of fluffy, fruity, golden scones ready to share (or not we won’t judge!).
Looking for inspiration? Try our Thick Chocolate Chip Cookies Recipe for another coffee shop classic you can bake at home.
PrintFluffy Fruit Scones Recipe: How to Make the Best Classic Treat at Home

Fruit Scones
There’s something irresistibly comforting about warm, fluffy fruit scones fresh from the oven. Split them in half and pile on a generous dollop of clotted cream and a spoonful of jam, pure heaven! Whether you’re preparing a classic afternoon tea or simply craving a cosy homemade bake, these fruit scones are the perfect choice. They’re quick, easy to make, and best of all , you probably already have all the ingredients in your kitchen.
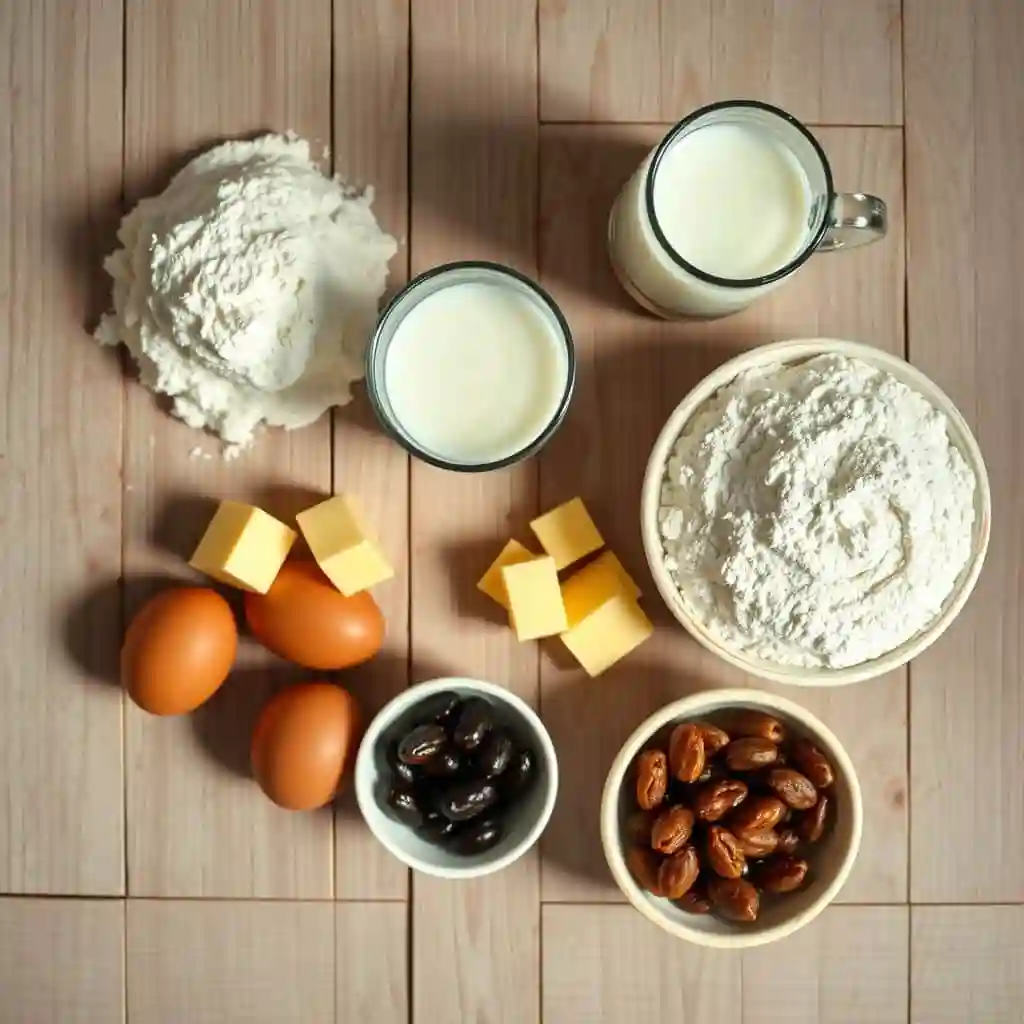
Ingredients
- 120g sultanas
- 400g self-raising flour, plus extra for dusting
- 90g butter, chilled*
- 1 tsp baking powder
- 1/2 tsp salt
- 40g caster sugar
- 170ml milk*
- 2 eggs
- 1 tsp vanilla extract or essence
Instructions
1. Preheat oven to 200°C (fan) or 220°C (conventional). Line a baking tray with parchment paper.
2. In a large bowl, whisk together self-raising flour, baking powder, and salt.
3. Add cubed cold butter and rub it into the flour with your fingertips until the mixture resembles breadcrumbs.
4. Stir in the sugar and dried fruit (raisins, sultanas, or currants).
5. In a small jug, lightly beat the egg and milk together.
6. Pour the liquid into the dry ingredients and mix gently with a knife in a figure-eight motion until a soft, shaggy dough forms.
7. Lightly flour your work surface and turn out the dough. Pat it into a round disc about 2.5 cm thick.
8. Use a 6 cm round cutter (floured) to cut out scones, pressing straight down without twisting.
9. Place scones on the tray, brush tops with milk or egg, and bake for 12–15 minutes until golden and well-risen.
10. Cool slightly on a rack and serve warm with clotted cream and jam.
Nutrition
- Serving Size: 1 scone
- Calories: 275
- Sugar: 8g
- Sodium: 170mg
- Fat: 9g
- Saturated Fat: 5g
- Trans Fat: 1g
- Carbohydrates: 41g
- Fiber: 1g
- Protein: 4g
- Cholesterol: 28mg
Table of Contents
Table of Contents
Why Fruit Scones Are a Beloved Classic
The History Behind Fruit Scones
The humble scone has a long and flavorful history born in the British Isles and beloved around the world. Originally made with oats and cooked on a griddle, scones evolved into the oven baked, buttery delights we know today. Over time, fruit scones became a staple of afternoon teas, favored for their subtle sweetness and satisfying texture. Their popularity soared in 19th century England, where they were served at elegant tea services alongside jams and creams. Nowadays, they’re beloved in settings ranging from warm, inviting homes to stylish, high-end cafés.
Why They’re a Staple in Afternoon Tea Culture
Afternoon tea isn’t quite complete without a warm scone. Light yet rich, with just the right amount of fruity chew, they pair beautifully with clotted cream and preserves. Their role in tea culture is almost ceremonial they represent indulgence, relaxation, and tradition. For many, the process of enjoying a fruit scone is as important as the scone itself. Whether you prefer cream or jam first (we won’t take sides!), it’s the joy of sharing and savoring that makes fruit scones a timeless treat.
Key Ingredients That Make the Best Fruit Scones
Role of Self-Raising Flour, Butter, and Milk
When it comes to making perfectly fluffy fruit scones, your ingredients are everything. Each one plays a specific role in texture, flavor, and rise and when they work in harmony, the results are nothing short of bakery worthy.
Self-raising flour is your secret weapon. It’s not just regular flour it contains just the right amount of leavening to give your scones their signature lift. Think tall, soft layers with a gentle crumb. For best results, use a fresh, sealed bag. Old flour loses its punch, and your scones might not rise the way you want them to.
Next up is unsalted butter, and here’s the deal: cold butter is non negotiable. When rubbed into the flour, those cold bits melt in the oven and create steam, which helps the scones puff up tall. It also gives them that buttery, flaky bite we all love. Keep your butter in the fridge until the very moment you’re ready to use it don’t let it soften.
Milk adds moisture and helps bind the dough together. It also reacts with the leavening agents in the flour to provide extra lift. Whole milk is ideal here it gives the scones richness without making them heavy. And yes, it should be cold too.
If your scones have ever come out flat or dense, chances are one of these three was off old flour, warm butter, or too much handling. Keep it simple, keep it cold, and your dough will do the rest.
Raisins, Sultanas, and Fruit Variations: What Works Best
So, what fruit is best in scones? Honestly, it depends on your flavor mood but the classic combo is raisins or sultanas. They offer a chewy contrast to the soft crumb, tiny pockets of sweetness in every bite.
Here’s a quick fruit breakdown:
| Fruit Option | Flavor Profile | Texture Impact | Best Pairing |
|---|---|---|---|
| Raisins | Sweet, slightly tangy | Chewy | Strawberry jam |
| Sultanas | Milder, juicy sweetness | Soft, moist | Raspberry jam |
| Currants | Tart and intense | Slightly chewy | Blackberry jam |
| Dried cranberries | Tart with a touch of zing | Chewy and plump | Orange marmalade |
| Mixed peel | Citrus tang | Sticky and aromatic | Clotted cream |
Not a fan of dried fruit? That’s okay! Fruit scones are incredibly versatile. Swap in chocolate chips, chopped dates, or even candied ginger for a twist. Just keep the add-ins small and dry, wet fruits like fresh berries can affect the dough texture.
Before adding the fruit, toss it lightly in flour. This keeps the pieces from sinking to the bottom of your dough and ensures they’re evenly distributed.
With these ingredients and tips in mind, you’ve got the foundation for perfect, classic fruit scones. And once you’ve nailed the base? You can get creative, which we’ll explore now. But first, let’s get our hands into some dough.
Step-by-Step Fruit Scones Recipe
Making fruit scones at home doesn’t require fancy tools or professional skills, just a handful of pantry staples and the right technique. This straightforward process will walk you through each step, helping you bake soft, fluffy, golden fruit scones packed with fruity flavor and the perfect rise.
Mixing the Dough Properly Without Overworking It
Start by adding your self-raising flour, baking powder, and a pinch of salt into a large mixing bowl. Whisk briefly to combine. This step ensures even distribution of your leavening agents and adds lightness to the base of your fruit scones.
Now grab your unsalted butter, it must be cold. Cut it into cubes and add it to the bowl. Using only your fingertips, rub the butter into the flour mixture until it looks like coarse breadcrumbs. This technique is key for creating the flaky texture that sets good fruit scones apart.
Once your mixture looks crumbly, stir in the caster sugar followed by your choice of dried fruit. Traditional fruit scones use raisins, sultanas, or currants, these add natural sweetness and a chewy texture that balances the crumb.
In a jug or small bowl, crack one cold egg and add a splash of cold milk. Lightly beat them together. Pour the liquid into the dry mixture and gently combine everything using a butter knife. Stir in a crisscross or figure-eight motion until the dough just begins to form. At this stage, your fruit scones dough should look rough and shaggy, not overmixed or sticky.
The dough should be tacky but not wet. If it feels too dry, add a teaspoon of cold milk. If it’s overly sticky, dust it lightly with flour. The goal is balance, your dough should hold together without being heavy.
Baking Techniques for the Perfect Rise
Lightly flour your work surface and turn the dough out gently. Don’t reach for the rolling pin. Instead, pat the dough by hand into a disc about 2.5 cm thick. This keeps your fruit scones light and helps them bake evenly.
Using a round cutter (6 cm is ideal), dip it in flour, then press straight down into the dough, no twisting. Twisting seals the edges, which can prevent a good rise. For tall, fluffy fruit scones, always lift the cutter straight up.
Place the cut fruit scones onto a parchment-lined baking tray, spacing them out slightly. For a lovely golden finish, brush the tops with a little milk or leftover egg mixture.
Preheat your oven to 200°C (fan). Bake your fruit scones for 12 to 15 minutes, or until they’re puffed up and golden brown. They should sound hollow when tapped underneath and feel light in the hand.
Once baked, cool your fruit scones on a wire rack, or enjoy them warm with jam and clotted cream. Few things in life beat the comfort of a warm fruit scone fresh from the oven.
Your kitchen smells incredible, your fruit scones are golden and fluffy, and you’ve just nailed a bake that never goes out of style. Up next: the real secrets to making your scones rise even higher in : Secrets to Light, Fluffy, Tall Scones.
Secrets to Light, Fluffy, Tall Scones
If your goal is those bakery-style, sky-high fruit scones with buttery layers and a soft interior, it’s not just about following the recipe, it’s about how you handle your ingredients. These expert secrets will help your scones rise tall, stay tender, and taste absolutely divine.
Temperature Tips: Cold Butter, Cold Milk, Cold Eggs
This might be the most important scone tip you’ll ever get: keep your ingredients cold. Seriously. This isn’t just a “nice to have”, it’s the foundation of fluffy scone success.
Here’s why: cold fat (in this case, butter) melts in the oven rather than during mixing. As it melts, it creates tiny steam pockets that push your scones upward, giving you that light and airy texture. If your butter starts to soften before the dough hits the oven, you’ll lose that magic.
The same goes for your milk and egg, chilled liquid keeps the dough cool and helps avoid over activating the gluten too early. If you’re working in a warm kitchen, even pop your mixing bowl and flour in the fridge for 10 minutes before starting. Every bit helps.
This “cold equals rise” principle is what separates flat, dense scones from the tall, flaky, coffee shop kind you’re aiming for.
Avoiding Common Scone Mistakes
Even with a great recipe, it’s easy to fall into a few classic traps that flatten or toughen your scones. Let’s break down what to avoid:
| Mistake | What Happens | How to Avoid It |
|---|---|---|
| Overmixing the dough | Tough, chewy scones | Mix until just combined; the dough should look rough and shaggy |
| Warming the butter | Flat, greasy scones | Use cold butter and keep it cold right up until baking |
| Rolling the dough out | Compressed dough with poor rise | Gently pat the dough with your hands instead |
| Twisting the cutter | Sloped, uneven scones | Press straight down and lift cleanly without turning |
| Using old flour or leavening | Poor rise and dense texture | Use fresh self-raising flour or check your baking powder’s date |
And here’s a little pro tip: don’t skip the resting time. Once your scones are cut and placed on the baking sheet, let them chill in the fridge for 10–15 minutes before baking. This firms the butter back up and helps lock in those flaky layers.
By mastering these small yet powerful techniques, you’ll consistently bake scones that rise high, break apart beautifully, and melt in your mouth with every bite.
Creative Flavour Twists for Fruit Scones

While traditional fruit scones are a timeless favorite, one of the best things about this bake is how versatile it is. Once you’ve nailed the classic version, there’s a whole world of flavor combinations you can explore. From zesty citrus to indulgent chocolate, these twists let you customize your scones to suit any mood, season, or occasion.
Adding Zest, Spices, Chocolate, or Nuts
Let’s start with a few simple additions that can completely transform your scones without altering the base recipe.
1. Citrus Zest
Add finely grated lemon, orange, or even lime zest to your dry ingredients. Just a teaspoon or two is enough to infuse the dough with a fresh, bright flavor. Citrus pairs beautifully with raisins or sultanas, and adds a refreshing contrast to the richness of cream and butter.
2. Warming Spices
Turn your scones into a cozy treat with a pinch of cinnamon, nutmeg, or mixed spice. These warm notes make your kitchen smell amazing and are perfect for fall and winter baking. For a subtle twist, try adding a pinch of ground ginger alongside your dried fruit.
3. Chocolate Chips
Swap the dried fruit for dark, milk, or white chocolate chips. Fold them in just before the wet ingredients. Chocolate scones are rich and indulgent, perfect with a hot drink on a chilly day. Don’t forget a sprinkle of coarse sugar on top before baking for an extra crunch.
4. Chopped Nuts
A handful of pecans, walnuts, or hazelnuts adds texture and nuttiness. Toast the nuts beforehand to deepen their flavor, then stir them in with your dry ingredients. You can also pair them with spices or citrus for layered flavor.
5. Dried Berries or Mixed Peel
Dried cranberries, cherries, or mixed peel offer pops of tangy sweetness. These options feel festive and work beautifully during the holidays. For a twist, soak them briefly in orange juice before adding to the dough for a juicier texture.
Here’s a quick idea board to spark your creativity:
| Add-In | Pair With | Suggested Topping |
|---|---|---|
| Lemon zest | Sultanas | Clotted cream & raspberry jam |
| Cinnamon & nutmeg | Raisins | Apple butter |
| Dark chocolate chips | Orange zest | Whipped cream |
| Chopped pecans | Dried figs | Honey drizzle |
| Dried cranberries | Mixed spice | Orange marmalade |
Sweet vs. Savoury Scones: Flavor Combinations
Though fruit scones tend to lean sweet, don’t overlook their savory cousins, especially if you’re planning a brunch spread or picnic basket. Here are a few savory twists that still use the same basic technique:
- Cheddar & Chive: Swap sugar and fruit for grated cheddar, chopped chives, and a pinch of black pepper.
- Feta & Sun-Dried Tomato: Tangy, salty, and perfect with a side of herbed butter.
- Parmesan & Rosemary: Elegant, aromatic, and best served warm from the oven.
The key with savory scones is to reduce or eliminate the sugar, and keep the mix-ins small so they don’t weigh the dough down.
With just a few tweaks, you can turn one great base recipe into a whole collection of signature bakes. Whether you’re craving something sweet, savory, or somewhere in between, scones give you a blank canvas full of flavor potential.
Next, we’ll cover how to present and serve your fruit scones for max wow-factor in : Serving and Presentation Ideas. Ready for more?
Serving and Presentation Ideas

Once your fruit scones are warm from the oven and golden on top, it’s time for the best part, serving them up in style. Whether you’re going full-on afternoon tea or keeping it casual, presentation and toppings can elevate your scones from a simple bake to a memorable experience.
Jam vs. Cream First Debate: What’s Traditional?
One of the most charmingly debated topics in the world of scones is the “jam or cream first” dilemma. It’s a lighthearted controversy with regional roots:
- Cornish Style: Jam first, then clotted cream on top. The idea is that the jam acts like butter and the cream is the indulgent topping.
- Devonshire Style: Clotted cream first, then the jam. In this version, cream is treated like butter, and jam finishes it off.
Which one’s right? That’s entirely up to you, and your guests. Why not try both and turn it into a fun tea-time taste test?
Regardless of the order, clotted cream and a good quality fruit jam (strawberry is the classic) are a must. If you can’t find clotted cream, substitute with thick whipped cream or mascarpone.
Plating Tips for Coffee Shops or Afternoon Teas
If you’re serving these at a brunch, café, or even a baby shower, how you present your scones can make a big difference in the experience. Here’s how to make them look irresistible:
1. Use Tiered Trays or Wooden Boards
Stacking scones on a tiered cake stand instantly creates that high-tea elegance. For a rustic vibe, use a wooden serving board with small bowls for cream and jam.
2. Dust with Icing Sugar
Just before serving, sift a little icing sugar over the top of your scones. It’s a quick trick that adds a touch of charm.
3. Serve with Mini Jars and Spreaders
Use mini jam jars and small serving spoons or spreaders for a personalized feel. Guests love the extra touch, and it keeps things neat.
4. Add Fresh Berries or Edible Flowers
Garnish your platter with fresh strawberries, raspberries, or even edible flowers like pansies or violets. It turns your bake into a centerpiece.
5. Provide Hot Beverages
Pair your scones with freshly brewed tea, coffee, or even iced herbal blends for warmer days. A good drink pairing brings out the richness of the scone and balances its sweetness.
Here’s a quick visual checklist for a complete scone spread:
| Serving Element | Description |
|---|---|
| Freshly baked scones | Warm, golden, ready to split |
| Clotted cream | Thick, chilled, spoonable |
| Strawberry jam | Sweet, fruity, smooth or chunky |
| Fresh berries | Strawberries, raspberries, blueberries |
| Tea or coffee | Hot or iced, depending on occasion |
| Sifted icing sugar | For that final dusted finish |
With thoughtful plating and just a few simple extras, your homemade fruit scones can feel just as special as anything you’d find in a café or patisserie. Next up, we’ll troubleshoot some of the most common scone baking issues in : Troubleshooting Common Scone Problems.
Shall I continue?
Troubleshooting Common Scone Problems
Even the most seasoned home bakers occasionally run into a few bumps when baking fruit scones. From flat tops to dry middles, the good news is that most issues have simple fixes. Let’s walk through the most common scone mishaps, and how to get them back on track.
Flat, Tough, or Dry Scones: What Went Wrong?
If your scones came out looking more like cookies than those tall, fluffy towers you were hoping for, don’t worry, you’re not alone. Here’s what could be causing the problem:
1. Flat Scones
Cause: Overmixed dough or warm butter.
Fix: Mix the dough only until it just comes together. Remember, less is more. And always start with cold butter and cold liquid. Once cut, refrigerate the scones for 10 minutes before baking to help them hold their shape and rise better.
2. Tough Texture
Cause: Too much kneading or rolling.
Fix: Treat the dough gently. Pat it out lightly with your hands instead of using a rolling pin. Overworking develops gluten, which makes scones chewy rather than tender.
3. Dry or Crumbly Scones
Cause: Not enough liquid or baking too long.
Fix: The dough should feel slightly tacky, not dry. Adjust with a splash of extra milk if it’s crumbly. Bake only until the tops are golden and the sides feel firm; overbaking leads to dryness.
4. No Rise
Cause: Old flour or baking powder.
Fix: Make sure your self-raising flour is fresh. If you’re using plain flour with baking powder, double check your ratio. Leavening agents lose power over time, especially when exposed to moisture.
5. Burnt Bottoms
Cause: Tray too close to heat source or thin baking sheet.
Fix: Bake on the middle rack, and if your oven runs hot, use a double-layered baking tray or place a second tray underneath to protect the bottoms.
Rescue Tips: How to Fix Dough and Save the Batch
Let’s say your dough didn’t come out quite right, maybe it’s too dry, too wet, or simply not behaving. Don’t toss it just yet. Try these quick fixes:
- Too Dry? Sprinkle in cold milk, one teaspoon at a time, until the dough just comes together.
- Too Wet? Dust lightly with self-raising flour. Be careful not to add too much or you’ll throw off the balance.
- Sticky Dough? Flour your hands and work surface, then pat the dough gently into shape without overhandling it.
Already baked them and things didn’t go to plan? No problem:
- Dry scones can be revived with a quick microwave zap and a dollop of butter or jam.
- Flat scones still taste amazing, just sandwich two together with cream and jam. No one will notice!
Baking isn’t about perfection, it’s about learning as you go. Each batch teaches you something new, and with these simple fixes, your next scone bake is guaranteed to be better than the last.
Coming up: we’ll talk about the perfect occasions and seasons for baking fruit scones in : Fruit Scones for All Seasons and Events. Let me know when to continue.
Fruit Scones for All Seasons and Events
One of the most beautiful things about fruit scones is their adaptability. Whether you’re baking in the crisp chill of fall or on a bright spring morning, there’s always a way to dress up a scone to match the season, or the moment. These versatile bakes aren’t just for afternoon tea, they’re perfect for brunches, picnics, birthdays, or cozy weekends at home.
Autumn Winter: Spiced and Nutty Scone Variants
When the air gets colder, your bakes should get warmer, at least in flavor. Here are a few ways to cozy up your fruit scones for fall and winter gatherings:
1. Apple & Cinnamon Scones
Dice a tart apple and stir it into your dough along with a teaspoon of cinnamon. The sweet-spicy combo pairs beautifully with clotted cream and honey or even a spiced butter.
2. Cranberry & Orange Zest
Dried cranberries offer that festive tartness, while a hit of orange zest brings brightness to every bite. Serve with orange marmalade or a dusting of powdered sugar for a winter brunch.
3. Toasted Pecan & Raisin
Add toasted pecans to your usual fruit scone mix. The buttery crunch combined with juicy raisins makes these an irresistible option for chilly afternoons and holiday hosting.
4. Nutmeg & Mixed Peel
For a truly nostalgic winter flavor, incorporate a pinch of nutmeg and a handful of mixed peel into your dough. These scones pair especially well with mulled cider or spiced tea.
Perfect For:
- Holiday breakfasts
- Christmas brunch boards
- Cozy weekend bakes
- Gift baskets and bake sales
Spring-Summer: Berry-Based or Citrus-Flavored Scones
Warmer months call for fresher, lighter flavors, and fruit scones shine just as bright under the summer sun.
1. Blueberry & Lemon Scones
Swap raisins for fresh or dried blueberries and add lemon zest. The juicy berries burst with flavor, and the lemon brings in a zingy lift. These are especially great for brunch with a dollop of Greek yogurt.
2. Strawberry & Basil Scones
Sounds unusual? Trust us, it works. Finely chopped basil adds a subtle herbal note that complements sweet strawberries beautifully. Serve with whipped cream and a drizzle of honey.
3. Coconut & Pineapple
For a tropical twist, use shredded coconut and tiny chunks of dried pineapple. These scones are great with lime curd or plain butter.
4. Cherry & Almond
Dried cherries with almond extract make for a bright, almost dessert-like scone. Top with a simple icing drizzle and you’ve got a bake-sale winner.
Perfect For:
- Mother’s Day brunch
- Spring garden parties
- Summer picnics
- Afternoon tea with friends
As the seasons change, so should your scones. With just a few tweaks, your base recipe can evolve into something festive, refreshing, or richly comforting, whatever the occasion calls for. These adaptable scones prove that classic never has to mean boring.
Up next: Learn how to keep your scones tasting fresh and delicious long after they’ve come out of the oven in : How to Store and Reheat Fruit Scones. Shall we keep going?
How to Store and Reheat Fruit Scones
You’ve baked the perfect batch of fruit scones, golden, fluffy, and packed with fruity goodness. But what if you’ve got leftovers (or you’re planning ahead for a gathering)? No worries, these scones keep beautifully when stored right, and they reheat like a dream. Let’s talk about how to lock in freshness and revive your scones for that just-baked texture.
Best Ways to Keep Scones Fresh
Scones are at their absolute best the day they’re baked, especially when served warm. But if you’re planning ahead or have extras, here’s how to store them properly:
1. Room Temperature (Short-Term)
- How: Place scones in an airtight container lined with a paper towel. Add another sheet of paper towel on top before sealing the lid.
- Shelf Life: 1–2 days.
- Why: The paper towels absorb excess moisture, keeping your scones from getting soggy or stale.
2. Freezing (Long-Term)
- How: Once cooled completely, wrap each scone tightly in cling film or foil, then store them in a freezer-safe bag or container.
- Shelf Life: Up to 3 months.
- Tip: Label and date your scones so you know when to use them. Freeze without any toppings for best texture after thawing.
3. Refrigerating (Not Recommended)
Avoid refrigerating baked scones. The fridge tends to dry them out faster than room temperature. If you absolutely must, store them in an airtight container and warm them gently before serving.
Don’t miss our kitchen prep guide for more baking tips, batch recipes, and make-ahead storage solutions (dynamic internal link placeholder).
Reheating Tips Without Drying Them Out
Want that fresh-from-the-oven warmth without turning your scones into hockey pucks? Here’s how to reheat them gently and effectively:
1. Oven (Best Method)
- Instructions: Preheat your oven to 300°F (150°C). Place scones on a baking tray and loosely cover with foil.
- Time: Bake for 5–10 minutes.
- Result: Crispy edges, soft middle, just like day one.
2. Microwave (Quick Fix)
- Instructions: Wrap a single scone in a damp paper towel and microwave on low for 10–20 seconds.
- Caution: Don’t overdo it, microwaves can turn scones rubbery if overheated.
- Result: Soft and warm, best served immediately.
3. Toaster Oven
If you’ve got one, it’s a happy medium between the oven and microwave. Use the lowest setting and warm for 5–6 minutes.
Bonus Tip: Refreshing Frozen Scones
If you’ve frozen your scones, defrost them at room temperature for 1–2 hours before reheating using any method above. This helps them warm more evenly and avoids soggy middles.
With the right storage and reheating technique, you can enjoy your fruit scones any time of day, days after baking. So bake that extra batch with confidence!
Now that we’ve covered baking, serving, and storage, up next is your FAQ section, where we answer the most common questions people have about making fruit scones. Ready to move forward?
Conclusion: A Scone for Every Occasion
From quiet Sunday mornings to elegant afternoon teas, few bakes deliver as much comfort and charm as a warm batch of fruit scones. Whether you’re sticking with traditional raisins or experimenting with bold flavor twists, this timeless bake continues to win hearts, and taste buds.
With simple ingredients, smart techniques, and a bit of care, you’ll be baking fruit scones that are golden, fluffy, and unforgettable. Just remember: keep everything cold, handle the dough gently, and most importantly, have fun. Because baking isn’t just about food, it’s about the warmth it brings into your kitchen and the memories you create with each batch.
So next time you want a treat that feels like a hug in pastry form, make it fruit scones, and make it with love.
FAQ Section: Your Fruit Scone Questions Answered
Baking the perfect fruit scones comes with a few classic questions, especially if you’re aiming for that ideal texture and flavor. Below are detailed answers to the most common queries, helping you feel confident every time you roll up your sleeves and start baking.
What fruit is best in scones?
The most traditional and widely loved fruit in scones is the raisin or sultana. They’re sweet, chewy, and evenly distribute throughout the dough. However, you’re not limited to just those. Currants, dried cranberries, chopped dates, or even mixed peel can bring different flavors and textures. For a seasonal twist, dried cherries, apricots, or blueberries also make excellent alternatives. The key is to use dried or semi-dried fruits, fresh fruit adds moisture that can alter the dough’s structure.
What is the secret to making good scones?
It’s all about technique and temperature. Cold ingredients are essential, especially butter, milk, and eggs. They create steam in the oven, leading to a better rise. Mix the dough gently, and avoid overhandling it, which can result in tough scones. Pat the dough out by hand (no rolling pins!) and cut using a straight press with your cutter, never twist it. Finally, bake in a hot oven and serve fresh for the best texture and taste.
What is the secret to fluffy scones?
Fluffy scones rely on three main secrets:
Cold Butter: Keeps the dough from becoming greasy and helps create air pockets during baking.
Minimal Mixing: Stir just until the dough comes together to avoid developing gluten.
Tall Dough: Don’t roll your dough too thin, keep it about 2.5 cm thick before cutting for maximum height.
Also, letting your shaped scones rest in the fridge for 10–15 minutes before baking firms the butter back up and helps them puff up beautifully.
What to avoid when making scones?
Avoid these common mistakes:
Overmixing the dough, which leads to toughness.
Warm butter, which prevents flakiness.
Thin dough, which results in flat scones.
Twisting the cutter, which seals edges and stops a proper rise.
Baking too long, which dries them out.
Use fresh self-raising flour, handle everything gently, and bake immediately after shaping, or chill briefly if needed. These small adjustments make a huge difference in the final result.
Did you try Our Recipe?
There are no reviews yet. Be the first one to write one.